Making a wet-plate collodion image is a time-consuming process. Obviously,
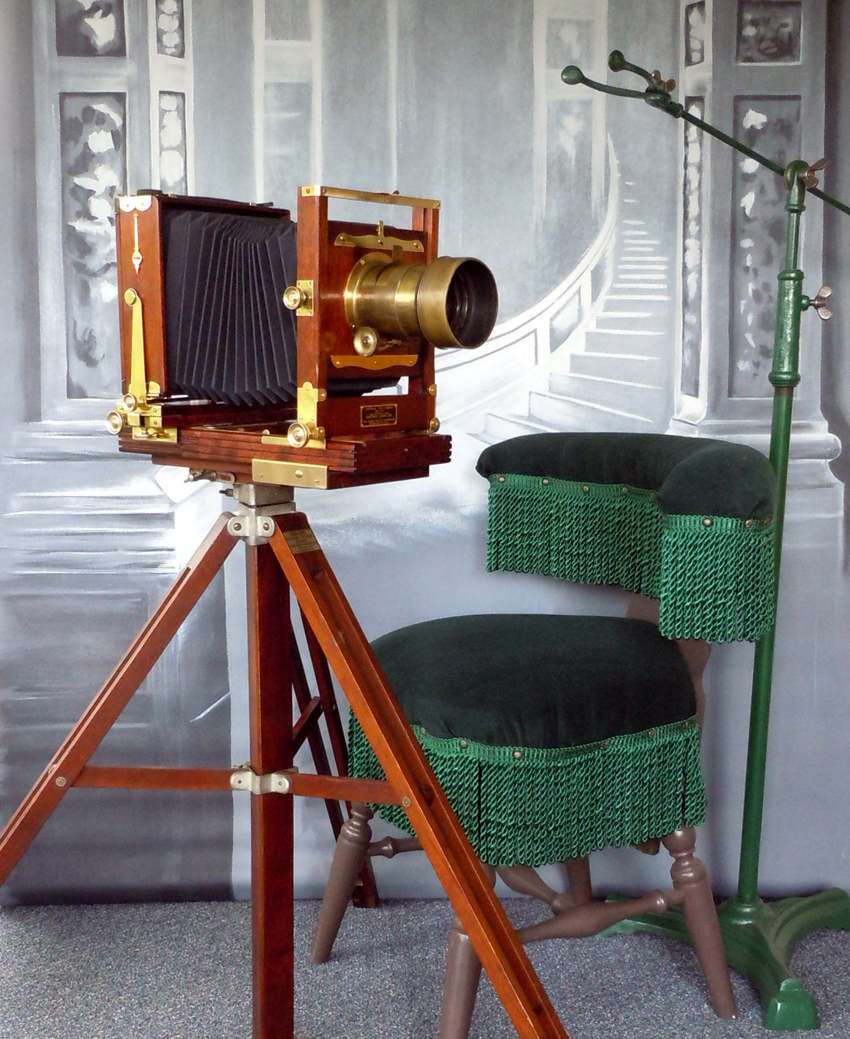
the camera is an important part. This is my favorite studio camera: a century-old
Eastman 2D fitted with an 1874 Dallmeyer 2B lens and mounted to a sturdy antique
studio tripod. Also shown are a traditional "posing chair" and a head brace
to help keep a sitter perfectly still during a long exposure. The painted backdrop
is an exact copy of one used in Mathew Brady's studio in Washington in the 1870s.
I
have two other cameras and several different lenses for various specialized applications,
but this is my workhorse.
Preparing to make a plate: in this instance I am using a piece of ruby-colored glass to make an ambrotype. The same technique is used for metal tintypes. I hold it on my fingertips; my right hand is on the bottle of liquid collodion which forms the emulsion. This part of the process can be done under normal light.

The collodion is carefully flowed over the plate, leaving a thin, perfectly even coating. (It's about 40% ether, so ventilation is important if you want to stay conscious.)

As soon as the collodion starts to get tacky (about 10 seconds) the plate is put into a holder and smoothly plunged into an upright container of silver nitrate solution. This turns any organic material black so after any session I have black stains on my fingers. (Many people wear latex gloves but I find they are awkward to work with.) Back in the day wet-plate photography was often called "The Black Art."

After 3 minutes in the silver nitrate solution the collodion emulsion is light sensitive so the next steps must be done under "safe light". The plate is removed from the solution and while still wet it is inserted into a plate holder, then taken to the camera. Prior to making a plate, a pose is set up. When it is time to take the picture last minute adjustments and refocusing is done to ensure everything is correctly arranged, then the lens cap is removed to make an exposure of 3-6 seconds to "strike" the image.

As soon as the picture has been struck, it's off to the darkroom to develop
it. Everything must be done rapidly, while the plate is still wet. If it dries out,
the picture will be ruined.
Developer (ferrous sulfate, alcohol, water, and
acetic acid) is flowed over the plate in one quick, smooth motion so that the plate
is covered without any of the liquid spilling over the edge. This technique takes
a great deal of practice to master. (Unlike conventional B&W photography, the
plate is not submerged, the developer just sits on top of the plate.) If the exposure
was correctly timed, the image will be fully formed in exactly 15 seconds. This must
be done under safe-light conditions, amber or red light.

Then the developer is immediately flushed with plenty of water to completely rinse away any remaining traces. You then have what looks like a negative:

The rest can be done under normal light. The negative image is placed in a holder and smoothly plunged into a solution of potassium cyanide. (Yes, it's very dangerous.)

In just a few seconds the negative begins to turn into a positive as the unexposed silver is chemically removed by the cyanide.

This is my favorite part of the whole process as the picture quickly comes to life.

As soon as it has cleared it must be removed from the cyanide or it will begin to disintegrate. Then it is thoroughly washed in clean water and allowed to air dry. The final step is to flow sandarac varnish onto the surface to protect the silver and prevent it from tarnishing, and quickly drying the varnish over a very hot kerosene lamp -- hopefully with no dust landing smack-dab in the center of the sitter's face. Properly done, this rapid heating causes the varnish to level out and yield a smooth, hard protective coating. When using a glass substrate for an ambrotype, great care must be exercised to avoid overheating and shattering the glass. Voilà, a finished portrait:

Note that tintypes and ambrotypes are mirror images. The light that reflects off the subject is focused through the lens directly onto the glass or metal substrate. There's no negative.